Angular micro-frontend architecture. Part 3/3 — MFE plugin-based approach. How to load micro-frontend component(s) inside HTML template?

Hello everyone! 👋
In this series of posts I will try to show with a real example how you can use the micro-frontend architecture (hereinafter abbreviated as MFE) in an Angular application. For implementation, we need libraries ngx-mfe, which depends on @angular-architects/module-federation.
If you find an error, please leave a note or leave a comment.
UPD 10.07.2022: updated article to new API of the ngx-mfe in v2.0.0
This is post 3 of 3 in the series “Angular micro-frontend architecture”
- The concept of micro-frontend architecture.
- Installing the Nx monorepо and creating micro-frontend apps.
- MFE plugin-based approach. How to load micro-frontend component(s) inside HTML template?
Contents
- Preface
- Installing and configuring ngx-mfe
- Conventions
- New and simplest variant to load MFE in Routing
- MFE plugin-based approach. How to display micro-frontend component(s) inside HTML template?
- How to display micro-frontend standalone component(s) inside HTML template?
- Features of the
*mfeOutletdirective - (Bonus) Configure mfeConfig for different builds (dev/prod)
- Conclusion
Preface
Before dive deep, you should consider @angular-architects/module-federation, you can read more about this library here.
If you have a question — “How to load a micro-frontend component(s) inside an HTML template?”, then let’s figure it out.
In other words, this approach to loading components is called the “plugin-based approach”.
In my understanding, the “plugin-based approach” is an architectural approach to developing a user interface, which is divided into separate and independent parts of the UI application (widgets), from which an application is assembled, like from Lego parts. In our case, widgets are exposed components of MFE (Remote), and they can be use in another micro-frontends or in the Shell (Host) app.
If it is not clear what is Remotes and what is Hosts, then you should read this article first.
The @angular-architects/module-federation library currently does not provide a functionality for working in the plugin-based approach, so you will need to install an additional small ngx-mfe library, in which one of the features is a directive for displaying the micro-frontend directly in the HTML template. I’ll talk about the rest of the features of this library (ngx-mfe) a little later.
Full code of this part can be find here 🔥!
Here is an example with a configured a loader and a fallback here 🔥!
Installing and configuring ngx-mfe
To install run the following command:
npm i ngx-mfeThis library depends on @angular-architects/module-federation v14 and Angular v13
If you are using Angular v12 and @angular-architects/module-federation v12.2.0 you should use this library v1.0.2.
The documentation of ngx-mfe library
Add the ngx-mfe library to a shared property in the ModuleFederationPlugin inside webpack.config.js file for each application in your workspace.

webpack.config.js with shared the ngx-mfe libraryTo configure this library, you should import MfeModule.forRoot(options: NgxMfeOptions)to the root module of the Host app(s) and the root module of the Remote apps in order for Remote to work correctly when running as a standalone application:
For feature modules just import
MfeModulewithout options, where, you may need the functionality of the library, for example, theMfeOutletDirectivedirective.
@NgModule({
  imports: [
    MfeModule.forRoot({
      mfeConfig: {
        "address-form": "http://localhost:4201/remoteEntry.js",
        "loaders": "http://localhost:4202/remoteEntry.js",
        "fallbacks": "http://localhost:4203/remoteEntry.js"
      },
      preload: ['loaders', 'fallbacks'],
      loaderDelay: 500,
      loader: {
        app: 'loaders',
        module: 'SpinnerModule',
        component: 'SpinnerComponent',
      }
      fallback: {
        app: 'fallbacks',
        module: 'MfeFallbackModule',
        component: 'MfeFallbackComponent',
      }
    }),
  ],
})
export class AppModule {}
Example with configured loader and fallback here!
List of all available options:
- mfeConfig — object where key is micro-frontend app name specified in
ModuleFederationPlugin(webpack.config.js) and value isremoteEntryUrlstring. All data will be sets toMfeRegistry.
Source code of the MfeRegistry here.
— — — — — — — — — — — — — — — — — —
Key it’s the name same specified in webpack.config.js of MFE (Remote) in the propertynamein theModuleFederationPlugin.
— — — — — — — — — — — — — — — — — —
Value set the following pattern:{url}/{remoteEntrypointFilename}.
-urlis the url where the remote application is hosted.
-remoteEntrypointFilenameis the filename supplied in the remote's webpack configuration.
Examplehttp://localhost:4201/remoteEntry.jsurl of AddressForm MFE.

You can get MfeRegistry by DI:
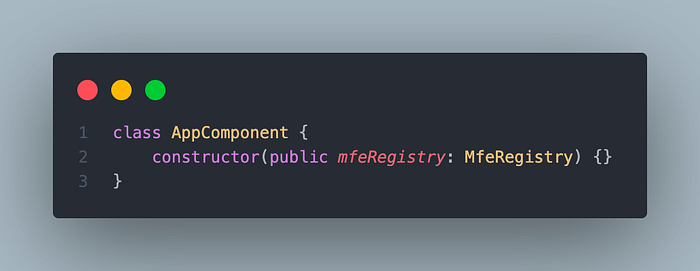
The MfeRegistry by DIOr you can even get MfeRegistry without DI, because this class is written as a singleton:

The MfeRegistry without DI- preload (Optional) — a list of micro-frontend names, their bundles (remoteEntry.js) will be loaded and saved in the cache when the application starts.
Next options are only works in plugin-based approach with MfeOutletDirective:
- loaderDelay (Optional) — Specifies the minimum loader display time in ms. This is to avoid flickering when the micro-frontend loads very quickly. By default is 0.
- loader (Optional) — Displayed when loading the micro-frontend.
Example:
// Globally uses the "SpinnerComponent" loader component declared in the "SpinnerModule" of the app "loaders".loader: {
  app: 'loaders',
  module: 'SpinnerModule',
  component: 'SpinnerComponent',
}
- fallback (Optional) — Displayed when loading or compiling a micro-frontend with an error.
Example:
// Globally uses the "MfeFallbackComponent" fallback component declared in the "MfeFallbackModule" of the app "fallbacks".fallback: {
  app: 'fallbacks',
  module: 'MfeFallbackModule',
  component: 'MfeFallbackComponent',
}
For better UX, add
loaderandfallbackmicro-frontends to thepreload.
You can get all configured options by injecting NGX_MFE_OPTIONS token by DI:

The app.module.ts file of the Shell app now looks like this:

The app.module.ts file of the Shell appConventions
Before diving deeper, read these conventions for the ngx-mfe library to work correctly:
1. To display a standalone MFE component, you only need to the component file itself.
A standalone component is a component that does not have any dependencies provided or imported in the module where that component is declared.
Since Angular v14 Standalone Component it is component that marked with
standalone: truein@Component({...})decorator.
When you display a standalone MFE component through [mfeOutlet] directive you must omit [mfeOutletModule] input.
// Standalone Component - standalone.component.ts
import { Component } from '@angular/core';
import { CommonModule } from '@angular/common';@Component({
  selector: 'app-standalone',
  standalone: true,
  imports: [CommonModule],
  template: ` <p>Standalone component works!</p> `
})
export class StandaloneComponent {}// dashboard-mfe webpack.config
{
  new ModuleFederationPlugin({
    name: 'dashboard-mfe',
    filename: 'remoteEntry.js',
    exposes: {
      StandaloneComponent:
        'apps/dashboard-mfe/src/app/standalone.component.ts',
    },
  });
}
<! — shell-app →<ng-template
  mfeOutlet=”dashboard-mfe”
  mfeOutletComponent=”StandaloneComponent”
>
</ng-template>
2. To display an MFE component with dependencies in the module where the component was declared, you must expose both the component file and the module file from ModuleFederationPlugin.
This approach is widely used and recommended.
When you display this type of MFE component with the [mfeOutlet] directive, you must declare an input [mfeOutletModule] with the value of the exposed module name.
3. The file key of an exposed Module or Component (declared in the ModuleFederationPlugin in the ‘expose’ property) must match the class name of that file.
For the plugin-based approach, when loads MFE using `[mfeOutlet]` directive you must declare Component in the exposed Module and the Component name must match the file key of an exposed Component class.
// webpack.config
{
  new ModuleFederationPlugin({
    name: 'dashboard-mfe',
    filename: 'remoteEntry.js',
    exposes: {
      // EntryModule is the key of the entry.module.ts file and corresponds to the exported EntryModule class from this file.
      EntryModule:
        'apps/dashboard-mfe/src/app/remote-entry/entry.module.ts',
      // the EntryComponent is key of file entry.module.ts, and match to exported EntryComponent class from that file.
      EntryComponent:
        'apps/dashboard-mfe/src/app/remote-entry/entry.component.ts',
    },
    [...]
  });
}
If the name of Module doesn’t match, you can specify a custom name for this Module in the @Input() property `mfeOutletOptions = { componentName: ‘CustomName’ }` of `[mfeOutlet]` directive, and pass `{ moduleName: ‘CustomName’ }` options to the `loadMfe()` function;
If the name of Component doesn’t match, you can specify a custom name for this Component in the @Input() property `mfeOutletOptions = { componentName: ‘CustomName’ }` of `[mfeOutlet]` directive, and pass `{ moduleName: ‘CustomName’ }` options to the `loadMfe()` function;
4. You must follow the rule that only one Component must be declared for an exposed Module. This is known as SCAM (Single Component Angular Module) pattern.
New and simplest variant to load MFE in Routing
To use micro-frontends in Routing, you must import and apply the helper function called loadMfe, like in the example below:

As you can see, it is enough for us to pass the app name and exposed file from that app without any additional parameters like as remoteEntry, type, exposedModule, etc.
MFE plugin-based approach. How to display micro-frontend component(s) inside HTML template?
This approach allows us to load micro-frontends directly from HTML.
The advantages of this approach are that we can display several MFEs at once on the same page, even display several of the same MFEs.
Let’s add FormComponent to our webpack config of the address-form app.
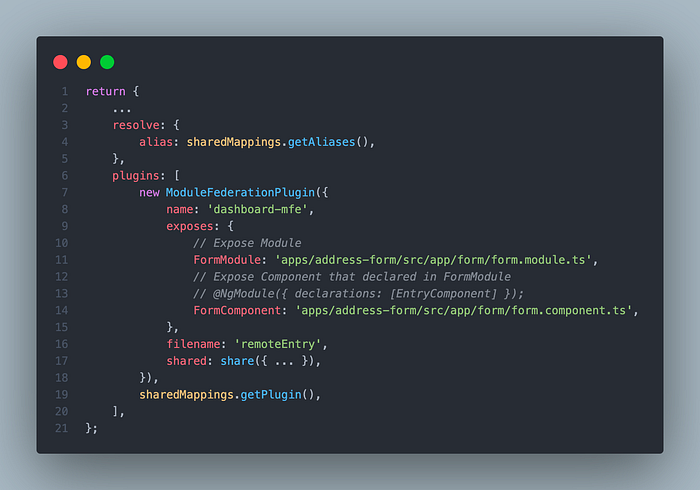
After changes in webpack.config.js file restart address-form app.
nx serve address-formNow, go to the app.component.html file in the shell app and add this:

app.component.html file in the Shell appRun Shell app and open http://localhost:4200 and you see our address-form component, thats it!
nx serve shell
As i said above you can add many MFEs of the same component:
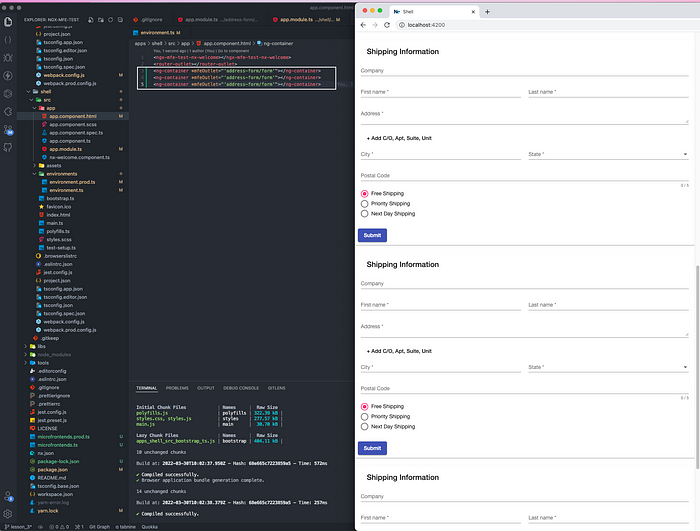
Here is an example with a configured a loader and a fallback here 🔥!
How to display micro-frontend standalone component(s) inside HTML template?
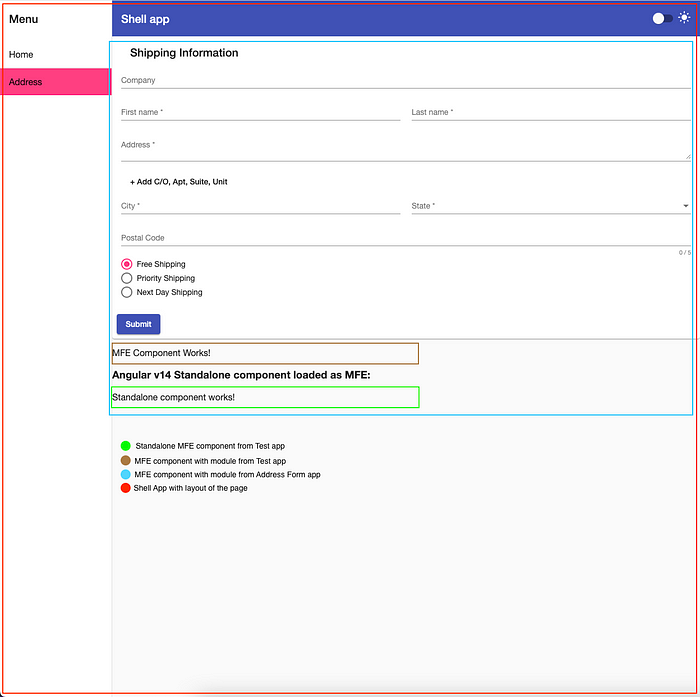
An example webpack.config.js that exposes the “StandaloneComponent” (green border in the screenshot above):
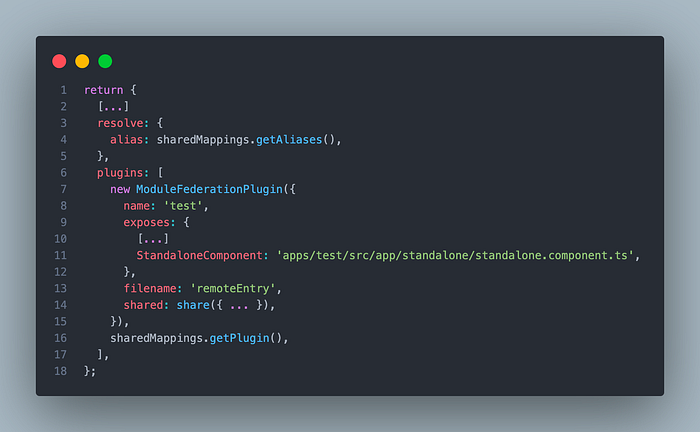

With *mfeOutlet structural directive display Standalone Component.

Features of the *mfeOutlet directive
- You can pass/bind
@Inputand@Outputprops to MFE component:


- You can override the default
loaderDelay, configured inMfeModule.forRoot({ … }), provide custom number in ms to propertyloaderDelay:
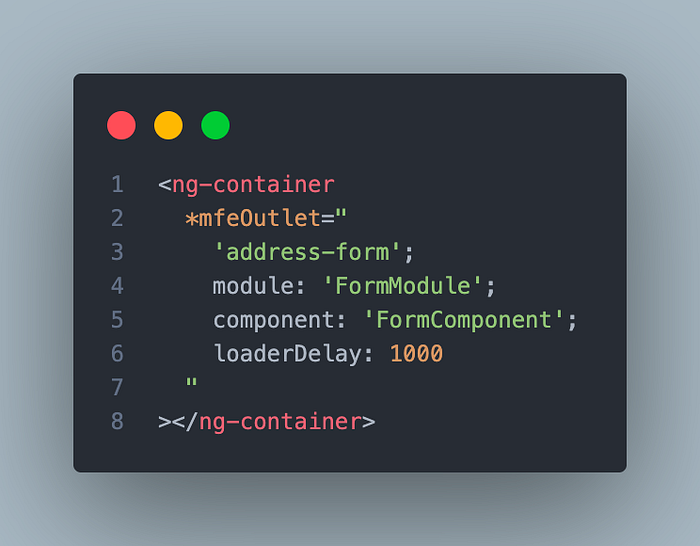
- To override the default loader and fallback MFE components, configured in
MfeModule.forRoot({ … }), specify content withTemplateRef, pass it to the appropriate propertiesloaderandfallback:
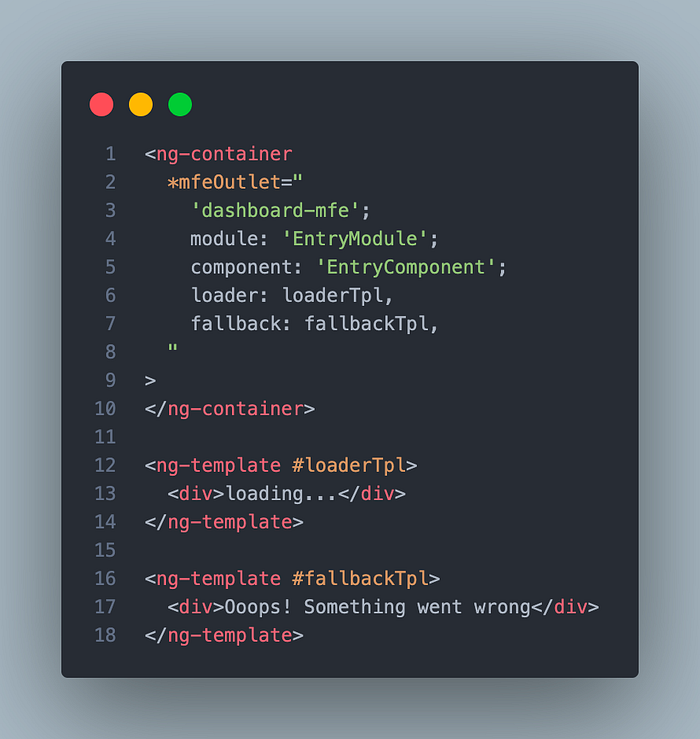

Loadercomponent shown when MFE is loading, andfallbackcomponent when error occurred while loading MFE or when creating MFE component, also if the MFE host now not running or not available then displayfallbackcomponent.
- You can also provide a custom injector for a component like this:

(Bonus) Configure mfeConfig for different builds (dev/prod)
This is optional section!
To be able to specify different MFE hosts (url) for different builds (dev/prod), we can define an object for mfeConfig in the environment.ts file, plus this will make our application more flexible.
Create two new files microfrontends.ts and microfrontends.prod.ts in root folder of our workspace, like this:
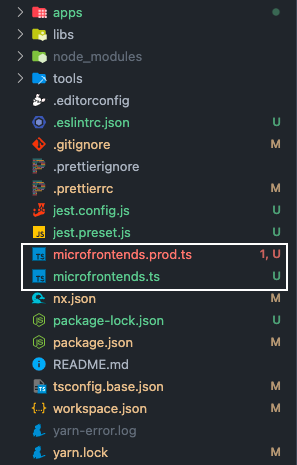
microfrontends.ts and microfrontends.prod.ts filesWrite to the microfrontends.ts this:
export const microfrontends = {
  'address-form': 'http://localhost:4201/remoteEntry.js',
};export type MicrofrontendsMap = {
  [key in keyof typeof microfrontends]: string;
};
Spread and override required MFE in the microfrontends.prod.ts.
import { microfrontends as _microfrontends, MicrofrontendsMap } from './microfrontends';export const microfrontends: MicrofrontendsMap = {
  ..._microfrontends,
  'address-form': 'http://localhost:5201/remoteEntry.js',
};
We set host for AddressForm MFE to
http://localhost:5201/remoteEntry.jsfor production build.
Import and add microfrontends object to the environment.ts and environment.prod.ts files, like this:
// environment.ts
import { microfrontends } from 'microfrontends';export const environment = {
  ...
  microfrontends
};
// environment.prod.ts
import { microfrontends } from 'microfrontends.prod';export const environment = {
  ...
  microfrontends
};
Finally, set the value of mfeConfig from environment.microfrontends:

Conclusion
The ngx-mfe library extends the basic functionality provided in @angular-architects/module-federation.
The advantage of the ngx-mfe:
- more convenient way to load MFE via Angular Routing;
- configure different
remoteEntryUrlof the MFE for different builds (dev/prod/etc.); - load multiple MFEs directly from the HTML template, with the ability to display the
loadercomponent during loading, and thefallbackcomponent on error.
If this article was helpful to you, clap 👏 , thanks!
